
Camper van conversion floor plans
I’ve always loved floor plans, especially RV floor plans; I love seeing how the space available can be used to its best advantage. I love how good design can make a space functional and efficient, while also being comfortable and calming.
So when we get to the point where we’re figuring out our own camper van conversion floor plans, I know I’ll be in my sweet spot!
When designing and building your own van conversion, you get to include everything that’s important to you, and omit anything that’s not.
So let’s have a look at the things you should could include in your camper van, and how you can design your ideal van layout.
If you haven’t bought a van yet, check out our post on the best van for converting to a camper van.
Articles on this site may contain affiliate links where we may receive a commission. Please see our Affiliate Disclosure for more information.
Examples of camper van layouts
The first (and most exciting IMO) step in designing your own layout, is to get inspiration from other camper vans.
If you’ve got friends with vans, you could ask them for a tour of their rig and an explanation of all the features they love/hate and what they would do differently.
If you don’t know anyone with a van, you’ll find a cornucopia of campervans being shared on Instagram.
Yes yes, I know social media is over run with stylised pictures of scantily clad girls and impossibly cool guys draped over perfectly framed camper vans.
But there are also HEAPS of Instagram accounts that are sharing practical and helpful information about their camper van conversions.
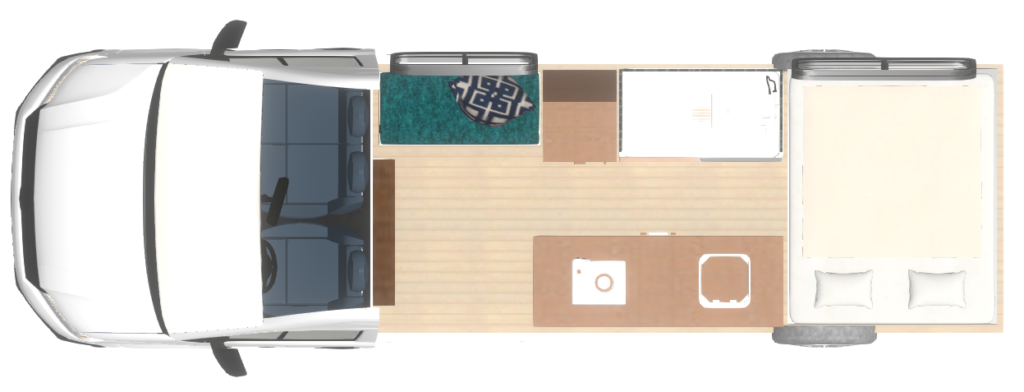
Here are some examples of different layouts that I like:
Fixed bed across the back, kitchen on one side, space to work on the other
Fixed bed across the back, with corner kitchen up front
Room to work
Seating up front
Convertible bed / dinette
Bathroom up front
Bathroom beside the bed
Now that you’re all inspired for your own build, and have seen how others have organised their space, and what they’ve included, it’s time to start designing your own camper van.
List of all the ‘pieces’ you want in your van conversion
This is where you nail down (figuratively speaking) all the pieces that you want to include in your van.
You may want to list them based on their priority to you.
- Bed
- Toilet and shower
- Kitchen – fridge, sink, stove top, storage
- Clothes storage
- Tech gear storage
- Tools storage
- Toilet and shower
- Garage for bikes
- Seats / table for eating and working
- Water tanks
- Waste tanks
- Batteries / inverter / controllers
- Rubbish bin and laundry basket
- Pet kennel
- Heater – electric, gas or diesel
- Fire extinguisher
You’ll want to find and record the standard dimensions for each of these items, and understand which of them can be sized to fit, and which will be the same size, no matter what.
Factors to consider when designing your van layout
Some questions to ask yourself, to make sure you’re considering all the things that you’d like to include.
These questions will also help you to prioritise what’s important to you.
Because chance are, you won’t be able to fit everything you want in a van, so it can be helpful to know beforehand, which items you’re willing to be flexible about.
- Sleeping arrangements – do you want a permanent bed, or are you willing to convert a bed every day? If you’re going to convert a bed everyday, do you have somewhere to store your bedding.
- Do you need garage space for large belongings? Under the bed may be the best place for these. Consider roof racks, bike racks or a tall storage area at the back doors.
- Do you want a bathroom? – Will you have water tanks big enough for a shower. Don’t forget you’ll need a water heater. What type of toilet will you have, do you need to have access to the waste cassette from the outside?
- Are you planning to install solar? Consider this when placing roof vents.
- Weight distribution – you’ll want to distribute weight as evenly as possible around the van
- Make sure you consider where plumbing and electrical will go – including where you’ll place power points and switches for their most convenient placement
- Don’t forget about natural lighting (unless you particularly want a stealth van with no windows)
- Are you planning to work on the road? Have you allocated enough space for all your gear and is it comfortable enough for a whole work day. Do you need to store tools or work clothes?
Designing your layout
Steps for designing the layout of your camper van.
1. Use a template
If you are able to find a template of your model of van, they can make things a lot easier.
You can buy templates here: https://vandimensions.com/floorplans or just do a google search for ‘van conversion template’.
2. Measure your van
There are plenty of approximate templates out there, so I would always check the templates are accurate by measuring it against your own van.
Don’t forget to include doors, windows, wheel hubs, vents and other inlets/outlets you’ll have to work around.
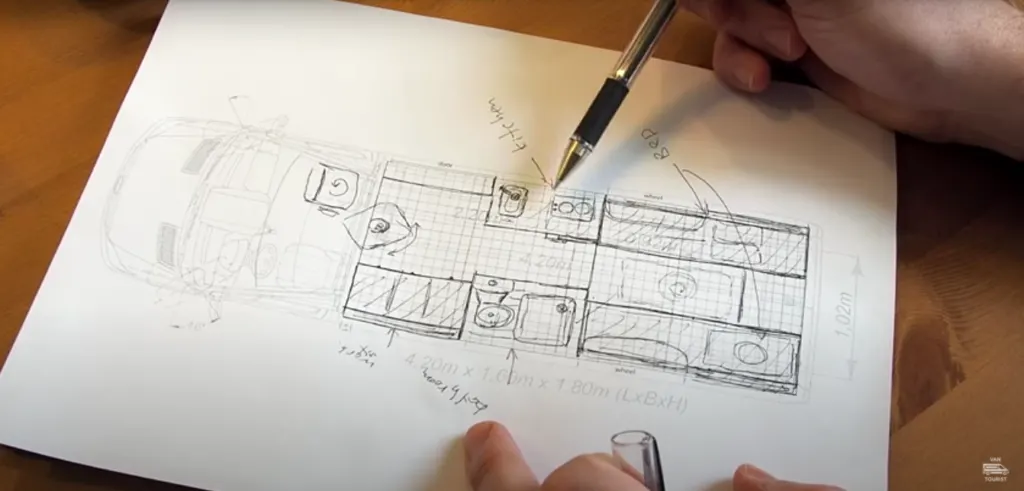
3. Draw up your designs
I have 4 suggestions for how you can draw up your designs:
One: Graph paper and pencil
Draw up your van template on graph paper. Take a gazillion photocopies and don’t draw on the original, so that you can always photocopy more if you need.

Two: VanSpace3D
I have purchased and been trying out a CAD (computer aided drawing) tool called Vanspace 3D.
I like it cos it has lots of van templates already, and you can add ready-made components and resize them.
And then you can view it from all different angles and get a really good idea of how your van will look when completed.
Oh, and it’s only $37 per year! (Yes, per year, not per month or anything crazy like that.)
It is a bit of learning curve figuring out how the app works; but it’s not too difficult.


Three: SketchUp
If you don’t want to spend the cash, SketchUp is free.
If you already know how to use SketchUp then you may want to save yourself the hassle of learning a new drawing program.
If you’ve used neither, I recommend you give vanspace3D a go.
It’s a learning curve (try not to throw anything at you laptop) but it’s worth it to be able to try lots of different layouts until you find what works best for you.
Four: Sportsmobile DYO Design Studio
I’ve just found this online design software on the Sportsmobile website.
I have’t had a chance to play around with it much, but it looks really detailed and an excellent way to design your van. (And it’s free to use)
http://sportsmobiledyo.com/dyo/
I think this one is definitely worth checking out.
4. Mark out the van
Once you have your layout designed, you should mark it out in the van with masking tape.
See how the space feels and whether you’ve given yourself enough room to move about and use all the functions of the van.
I’ve seen others that have built cardboard or corflute mockups of the main pieces of furniture; this is perfect for really understanding the space you have to work with.
Do you have any other tips for designing your own camper van conversion layout? We’d love to see them.